Woodworker's Journal 2004 Summer, страница 67
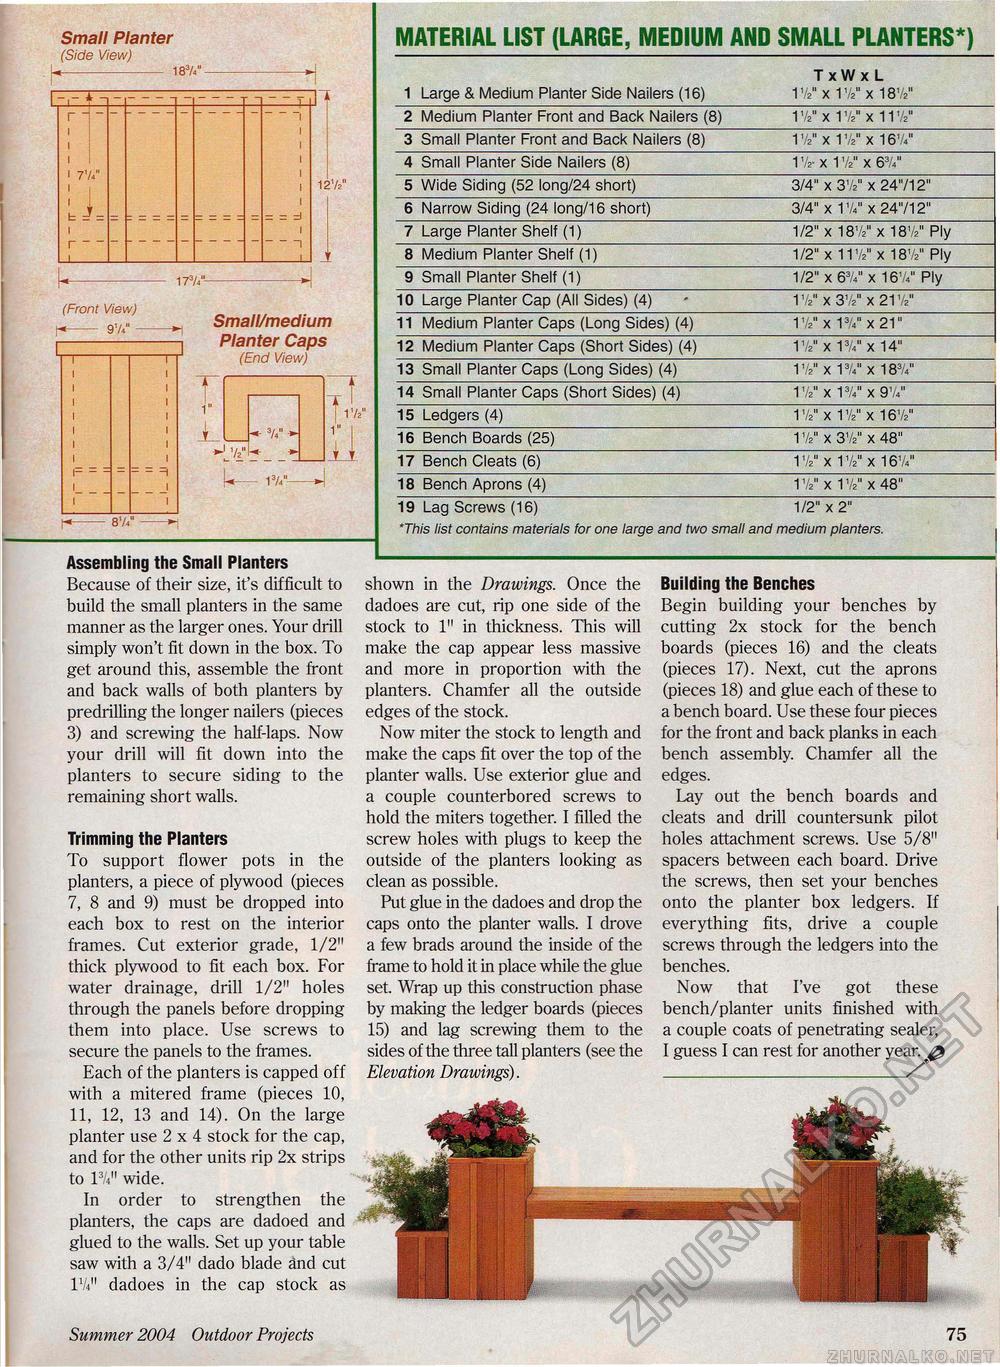
Small Planter (Side View) 18V - 18V -
12'/ a" 12'/ a" (Front View) t*- 9'A" - Small/medium Planter Caps (End View) r i" r i" r
13/V 13/V s'A" Assembling the Small Planters Because of their size, it's difficult to build the small planters in the same manner as the larger ones. Your drill simply won't fit down in the box. To get around this, assemble the front and back walls of both planters by predrilling the longer nailers (pieces 3) and screwing the half-laps. Now your drill will fit down into the planters to secure siding to the remaining short walls. Trimming the Planters To support flower pots in the planters, a piece of plywood (pieces 7, 8 and 9) must be dropped into each box to rest on the interior frames. Cut exterior grade, 1/2" thick plywood to fit each box. For water drainage, drill 1/2" holes through the panels before dropping them into place. Use screws to secure the panels to the frames. Each of the planters is capped off with a mitered frame (pieces 10, 11, 12, 13 and 14). On the large planter use 2x4 stock for the cap, and for the other units rip 2x strips to 13A" wide. In order to strengthen the planters, the caps are dadoed and glued to the walls. Set up your table saw with a 3/4" dado blade and cut IV411 dadoes in the cap stock as MATERIAL LIST (LARGE, MEDIUM AND SMALL PLANTERS*)
shown in the Drawings. Once the dadoes are cut, rip one side of the stock to 1" in thickness. This will make the cap appear less massive and more in proportion with the planters. Chamfer all the outside edges of the stock. Now miter the stock to length and make the caps fit over the top of the planter walls. Use exterior glue and a couple counterbored screws to hold the miters together. I filled the screw holes with plugs to keep the outside of the planters looking as clean as possible. Put glue in the dadoes and drop the caps onto the planter walls. I drove a few brads around the inside of the frame to hold it in place while the glue set. Wrap up this construction phase by making the ledger boards (pieces 15) and lag screwing them to the sides of the three tall planters (see the Elevation Drawings). Building the Benches Begin building your benches by cutting 2x stock for the bench boards (pieces 16) and the cleats (pieces 17). Next, cut the aprons (pieces 18) and glue each of these to a bench board. Use these four pieces for the front and back planks in each bench assembly. Chamfer all the edges. Lay out the bench boards and cleats and drill countersunk pilot holes attachment screws. Use 5/8" spacers between each board. Drive the screws, then set your benches onto the planter box ledgers. If everything fits, drive a couple screws through the ledgers into the benches. Now that I've got these bench/planter units finished with a couple coats of penetrating sealer, I guess I can rest for another year. jfr Summer 2004 Outdoor Projects 75 |
|||||||||||||||||||||||||||||||||||||||||||||||||||||||||||||||||||||||||||||||||||||||||||||


